Save on your first order. Shop 15% off
Save on your first order. Shop 15% off
Short Start Guide to Framer: Master Basics
Short Start Guide to Framer: Master Basics
Short Start Guide to Framer: Master Basics
Starting with Framer and building your first website might look overwhelming first. Here's a short guide to get you started.
Starting with Framer and building your first website might look overwhelming first. Here's a short guide to get you started.
Starting with Framer and building your first website might look overwhelming first. Here's a short guide to get you started.
Framer is an innovative and user-friendly platform for building professional websites that revolutionizes the way these are designed.
This article introduces Framer’s intuitive interface and diverse range of features, highlighting how they make the web design process easier than ever.
It's perfect for both beginners and experienced designers looking to create professional, responsive websites efficiently.
Keep reading to master Framer’s features!
Getting Started with Framer
Step 1: Sign Up
The journey begins with signing up on Framer.
Choose between using your email or Google account for a quick start.
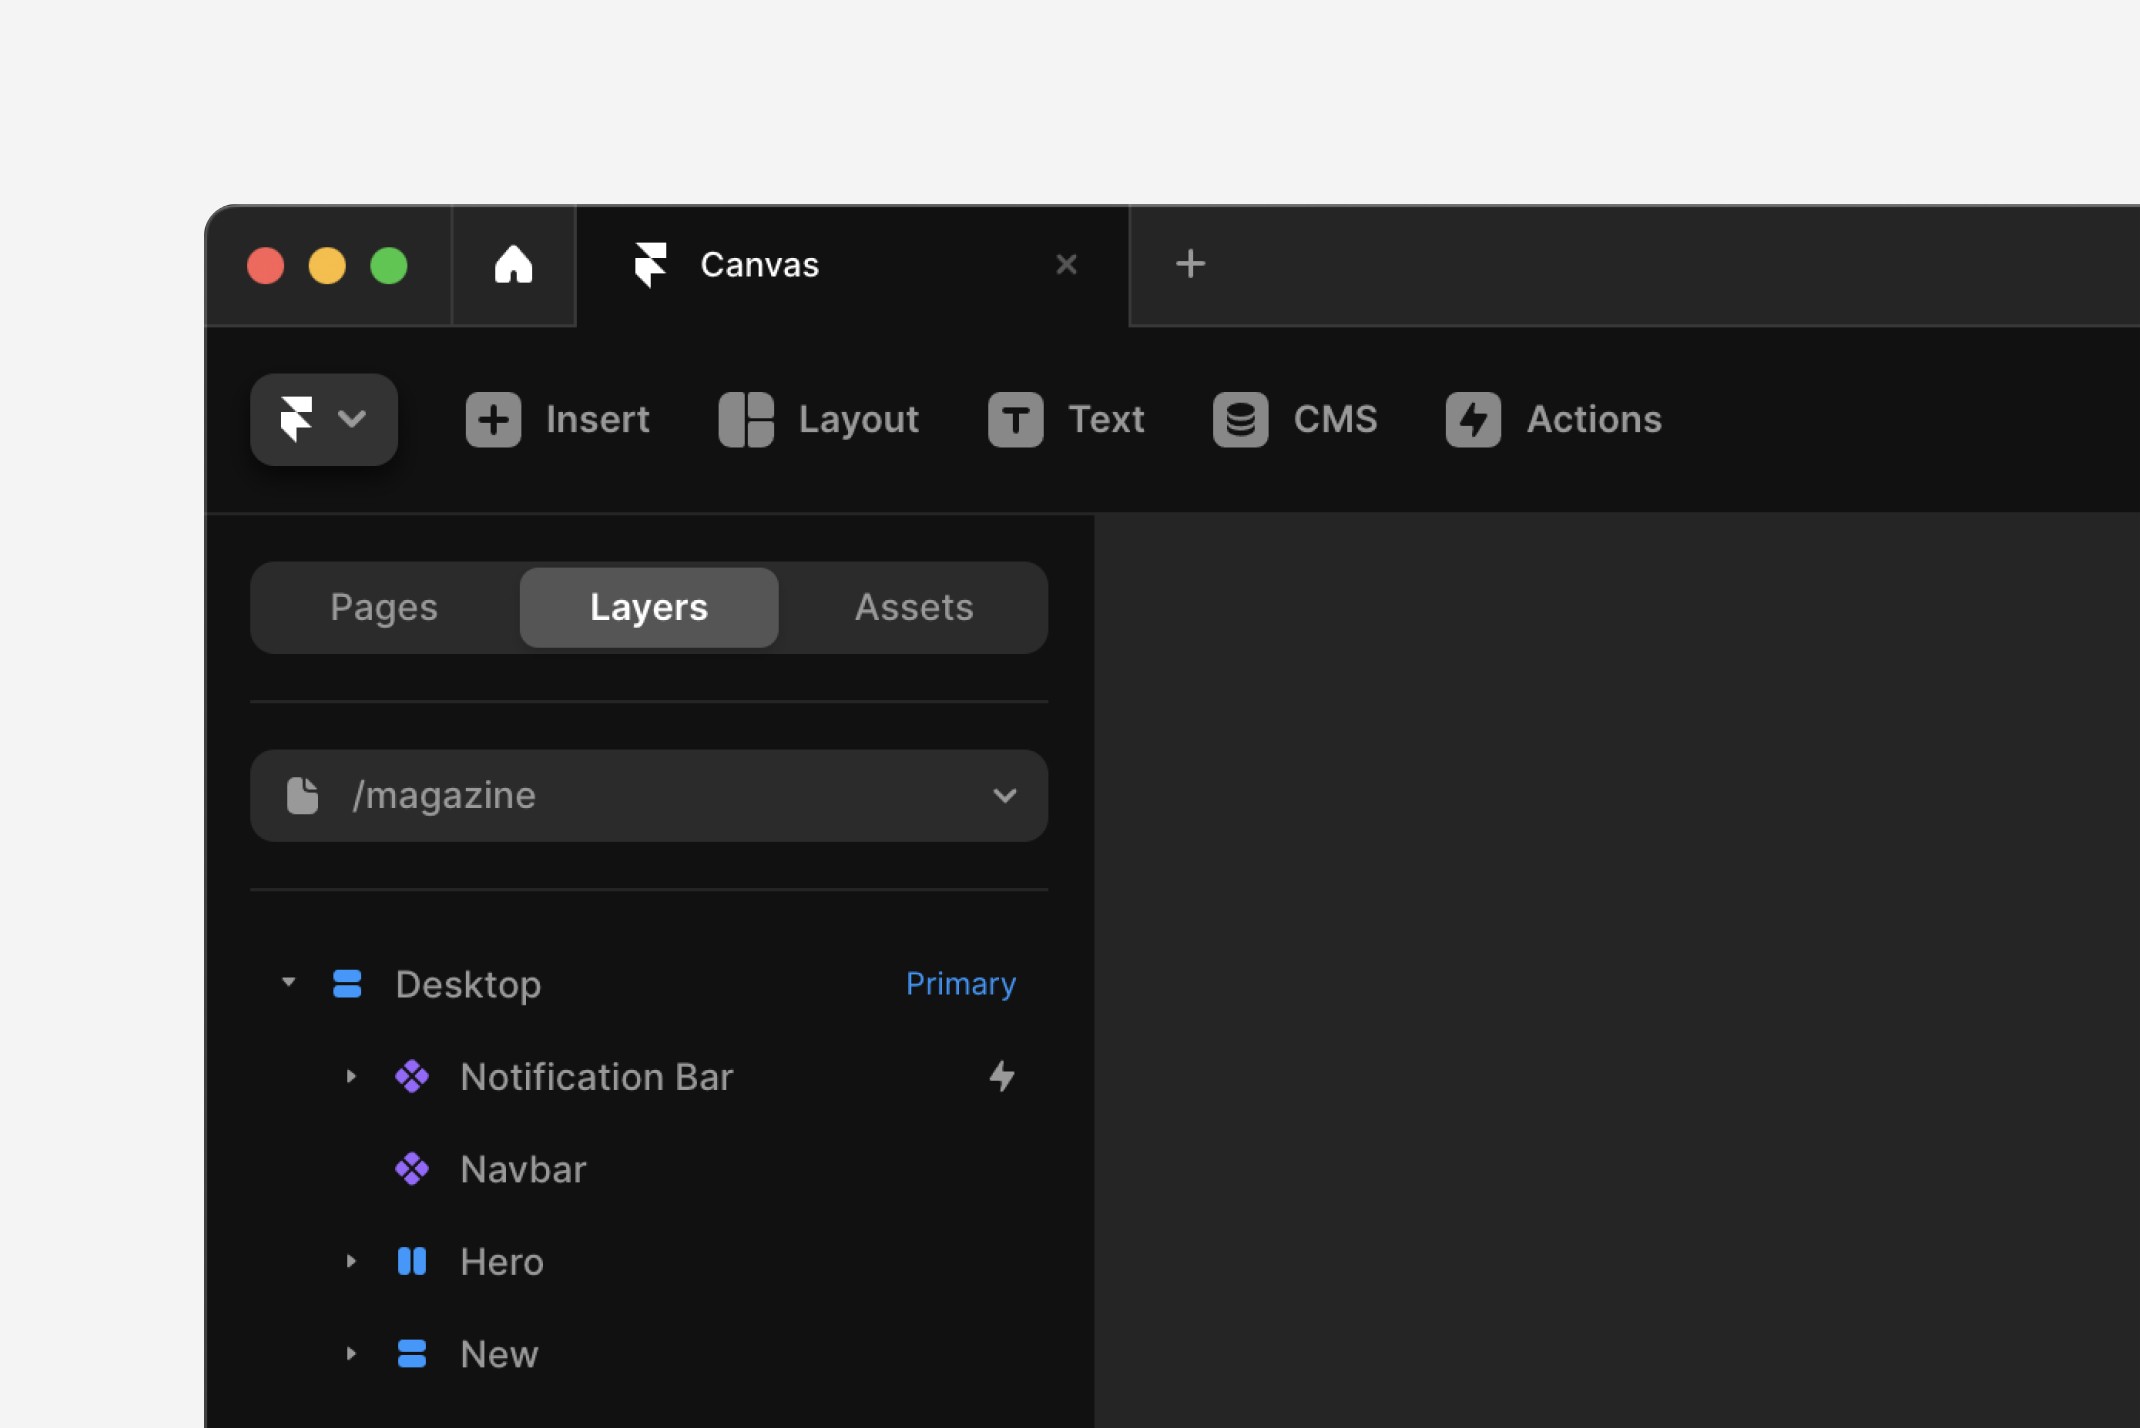
Once you are registered, the dashboard greets you as your new command center. This is where your web design adventure begins, with all tools and features at your fingertips.
Step 2: Creating Your First Framer Site
The Framer dashboard serves as a portal to your creative world. So make sure you put in the effort to learn and perfect it. Learn about its layout and how each tool may help you bring your website to life.
It is intuitively designed for easy navigation, allowing you to manage projects effortlessly.
However, we will walk you through the initial steps to creating it:
To get started, go to the top left and select "Dashboard". This will create a new site, which will be built up so that you can instantly see the desktop preview.
Something we also recommend is adding breakpoints, as it allows for simultaneous previews on computers, tablets and phones, ensuring adaptability across devices.
Step 3: Adding a Navigation Bar
The navigation bar is your website's compass.
Now, the time has come to insert a navigation bar and select one of the various options presented by Framer. We recommend you use the ones suggested because they are specifically tailored for optimal user interaction.
You can now play with the size, font and color of the texts, buttons, and grading colors.
So have fun with it and discover which one suits you best!
Step 4: Designing the Hero Section
The Hero section is where first impressions are made.
Framer's toolkit allows you to create a visually captivating Hero section. You can begin by clicking insert and adding this section to your desktop.
You can then customize this by selecting an image, experimenting with color schemes for the background, and adding dynamic effects that resonate with your page.
How do I add effects to my Hero section?
Easy!
You can add effects to anything by clicking on it and then looking in the effects panel for the perfect fit.
There are several possibilities, so make sure you try them all and choose the one that adapts best to you!
Step 5: Enhancing with Scroll Effects
Scroll effects can transform user interaction.
You can add these by simply adding a new section or selecting an item you want to customize, for example, an image or a text.
There are different effects you can use so your website looks dynamic, adding depth and engagement to your website's design.
Step 6: Customizing the Footer
The footer serves as the anchor for your website's information.
This is a vital part of your website and should be user-friendly. In other words, if a person is looking for something, they should be able to locate it there.
It is also important that you align it with your site's overall theme and enhance its functionality.
Step 7: Ensuring Cross-Device Optimization
In today's multi-device world, optimization across platforms is key.
Do not overlook this and take advantage of Framer's layout tools to ensure your website delivers a consistent and responsive experience on any device.
Play around with the three templates provided, each for one type of device.
Step 5: Publishing Your Website
Publishing is a milestone in your web design journey. It means you are ready to show your creative masterpiece.
So, go ahead… just click that Publish button!
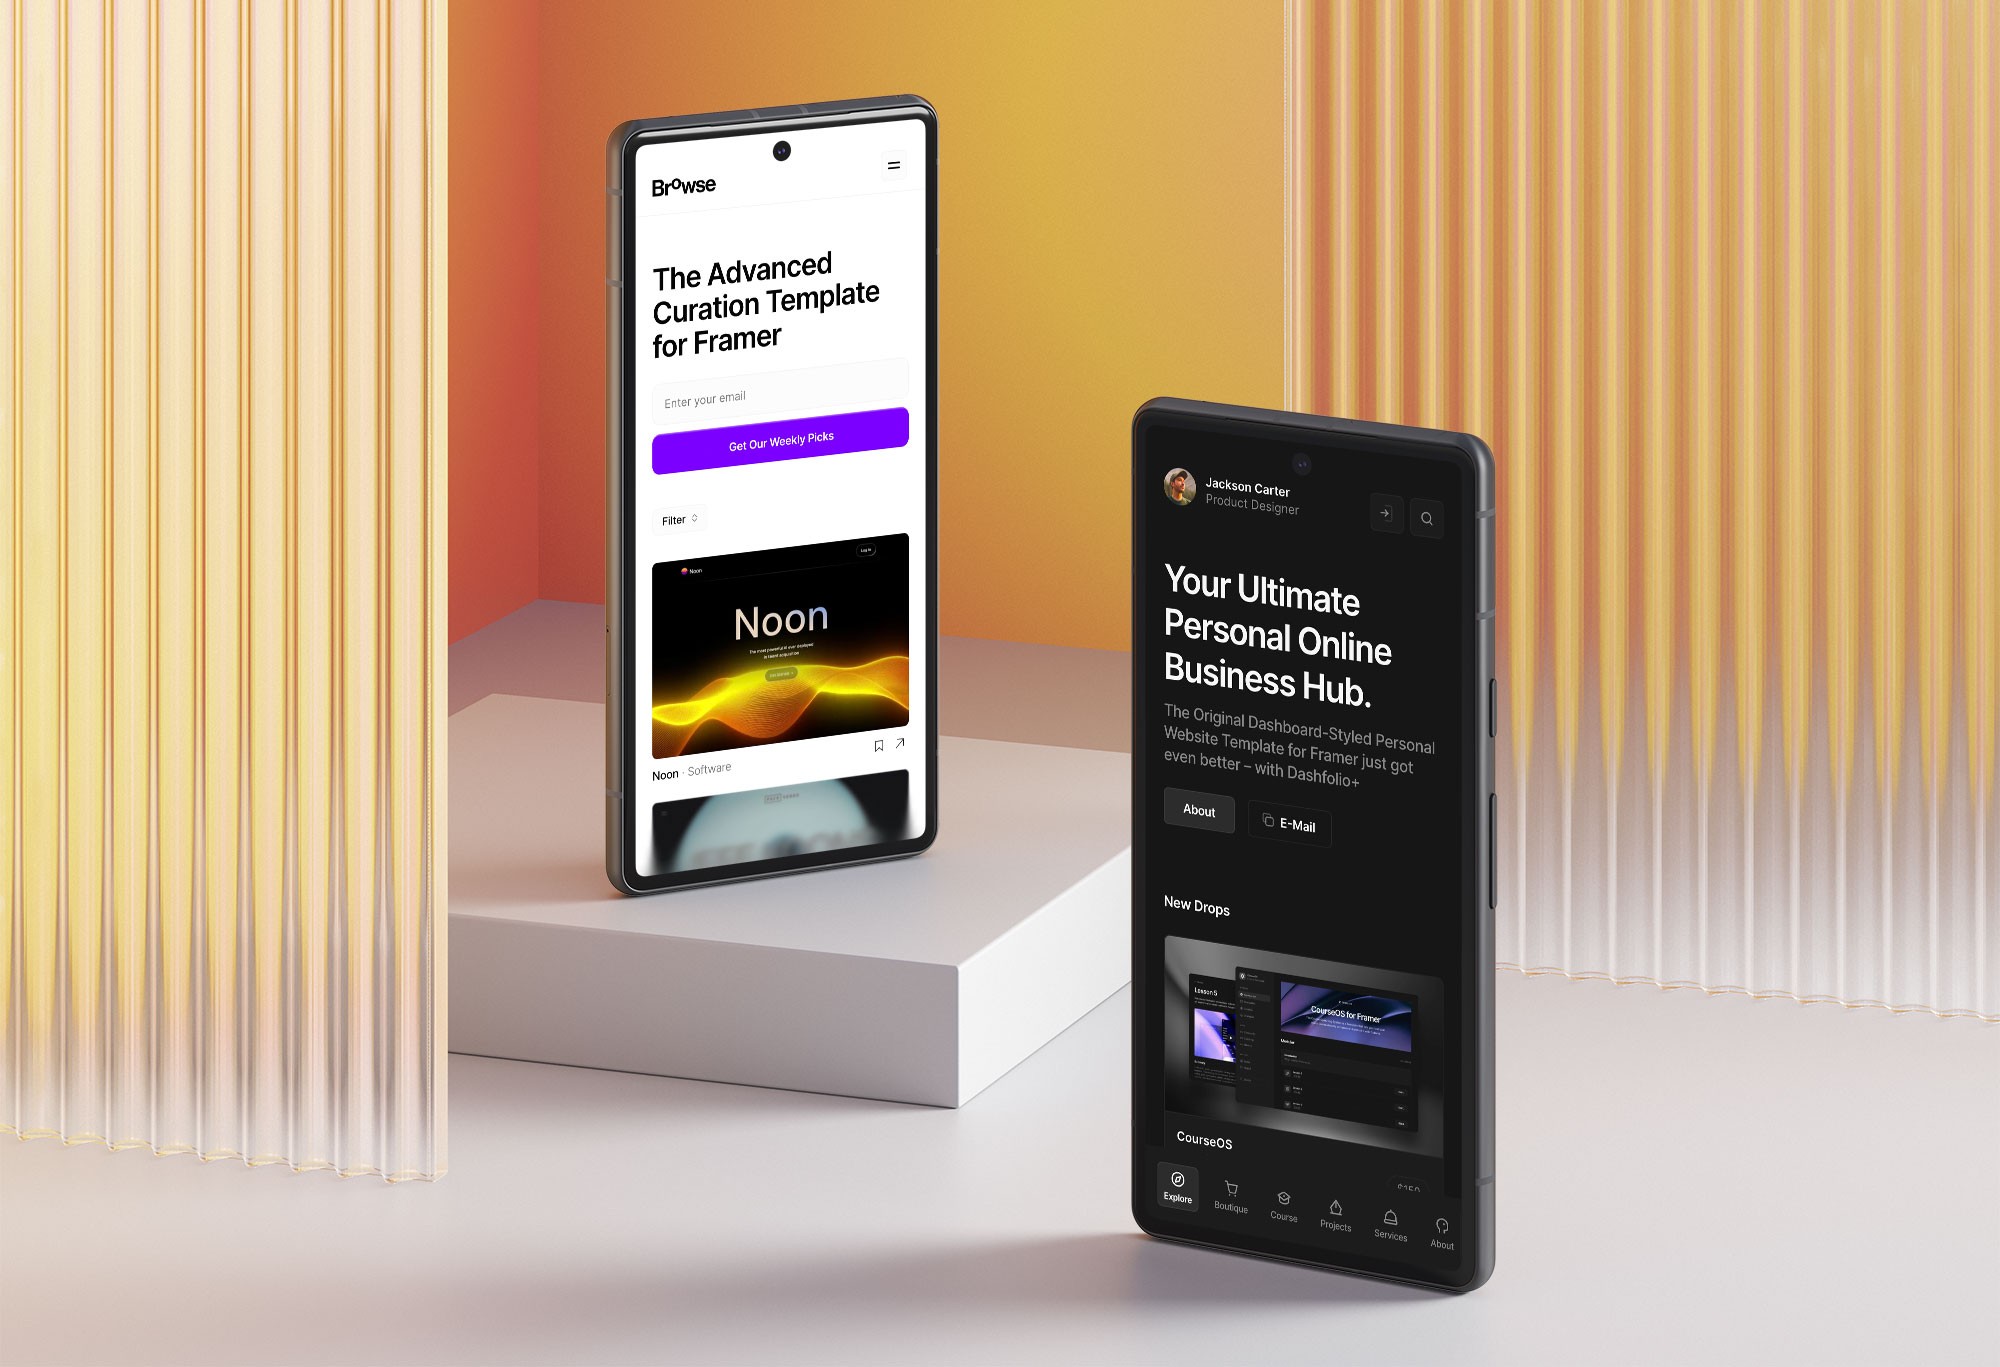
A Professional Touch to Templates
Now that you've mastered creating a fantastic website with this tool, you might consider skipping the initial steps and opting for a professional touch.
It is not that you do not know how to make a website, of course not, you just learned it. But maybe you want to focus on efficiency and prefer to avoid the initial hassle. And this is where Canvas Supply comes in.
Our gallery features a wide array of templates, each meticulously crafted for different projects and goals. From personal blogs to e-commerce sites and online courses, you will find a template that perfectly suits your needs and elevates your project.
Frequently Asked Questions - (FAQs)
Can Framer's design be previewed on different devices?
Yes, Framer allows you to preview your design on various devices by adding breakpoints.
Is it easy to customize the navigation bar and footer in Framer?
Absolutely, Framer offers easy-to-use tools for customizing both the navigation bar and footer.
Can I add effects to my page with Framer?
Of course, you can add effects to anything you would like simply by clicking on it and then looking in the effects panel for the perfect fit. There are several possibilities, so make sure you try them all and choose the one that adapts best to you!
Framer is an innovative and user-friendly platform for building professional websites that revolutionizes the way these are designed.
This article introduces Framer’s intuitive interface and diverse range of features, highlighting how they make the web design process easier than ever.
It's perfect for both beginners and experienced designers looking to create professional, responsive websites efficiently.
Keep reading to master Framer’s features!
Getting Started with Framer
Step 1: Sign Up
The journey begins with signing up on Framer.
Choose between using your email or Google account for a quick start.
Once you are registered, the dashboard greets you as your new command center. This is where your web design adventure begins, with all tools and features at your fingertips.
Step 2: Creating Your First Framer Site
The Framer dashboard serves as a portal to your creative world. So make sure you put in the effort to learn and perfect it. Learn about its layout and how each tool may help you bring your website to life.
It is intuitively designed for easy navigation, allowing you to manage projects effortlessly.
However, we will walk you through the initial steps to creating it:
To get started, go to the top left and select "Dashboard". This will create a new site, which will be built up so that you can instantly see the desktop preview.
Something we also recommend is adding breakpoints, as it allows for simultaneous previews on computers, tablets and phones, ensuring adaptability across devices.
Step 3: Adding a Navigation Bar
The navigation bar is your website's compass.
Now, the time has come to insert a navigation bar and select one of the various options presented by Framer. We recommend you use the ones suggested because they are specifically tailored for optimal user interaction.
You can now play with the size, font and color of the texts, buttons, and grading colors.
So have fun with it and discover which one suits you best!
Step 4: Designing the Hero Section
The Hero section is where first impressions are made.
Framer's toolkit allows you to create a visually captivating Hero section. You can begin by clicking insert and adding this section to your desktop.
You can then customize this by selecting an image, experimenting with color schemes for the background, and adding dynamic effects that resonate with your page.
How do I add effects to my Hero section?
Easy!
You can add effects to anything by clicking on it and then looking in the effects panel for the perfect fit.
There are several possibilities, so make sure you try them all and choose the one that adapts best to you!
Step 5: Enhancing with Scroll Effects
Scroll effects can transform user interaction.
You can add these by simply adding a new section or selecting an item you want to customize, for example, an image or a text.
There are different effects you can use so your website looks dynamic, adding depth and engagement to your website's design.
Step 6: Customizing the Footer
The footer serves as the anchor for your website's information.
This is a vital part of your website and should be user-friendly. In other words, if a person is looking for something, they should be able to locate it there.
It is also important that you align it with your site's overall theme and enhance its functionality.
Step 7: Ensuring Cross-Device Optimization
In today's multi-device world, optimization across platforms is key.
Do not overlook this and take advantage of Framer's layout tools to ensure your website delivers a consistent and responsive experience on any device.
Play around with the three templates provided, each for one type of device.
Step 5: Publishing Your Website
Publishing is a milestone in your web design journey. It means you are ready to show your creative masterpiece.
So, go ahead… just click that Publish button!
A Professional Touch to Templates
Now that you've mastered creating a fantastic website with this tool, you might consider skipping the initial steps and opting for a professional touch.
It is not that you do not know how to make a website, of course not, you just learned it. But maybe you want to focus on efficiency and prefer to avoid the initial hassle. And this is where Canvas Supply comes in.
Our gallery features a wide array of templates, each meticulously crafted for different projects and goals. From personal blogs to e-commerce sites and online courses, you will find a template that perfectly suits your needs and elevates your project.
Frequently Asked Questions - (FAQs)
Can Framer's design be previewed on different devices?
Yes, Framer allows you to preview your design on various devices by adding breakpoints.
Is it easy to customize the navigation bar and footer in Framer?
Absolutely, Framer offers easy-to-use tools for customizing both the navigation bar and footer.
Can I add effects to my page with Framer?
Of course, you can add effects to anything you would like simply by clicking on it and then looking in the effects panel for the perfect fit. There are several possibilities, so make sure you try them all and choose the one that adapts best to you!
Created on Dec 15, 2023

Welcome to the Canvas Blog!
If you’ve come to learn about Framer, design and freelance & business tips, we’ve got you covered. I'm Cédric, the author and founder of Canvas.
Latest Articles


Welcome to the Canvas Blog!
If you’ve come to learn about Framer, design and freelance & business tips, we’ve got you covered. I'm Cédric, the author and founder of Canvas.
Latest Articles
Welcome to the Canvas Blog!
If you’ve come to learn about Framer, design and freelance & business tips, we’ve got you covered. I'm Cédric, the author and founder of Canvas.